Monday, 13 March 2017

Microsoft is disgustingly sneaky: Windows 10 isn't an operating system, it's an advertising platform

vwindows-10-dvd
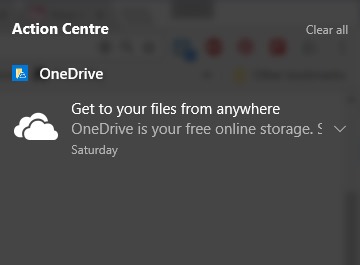
Don't believe what Microsoft tells you -- Windows 10 is not an operating system. Oh, sure, it has many features that make it look like an operating system, but in reality it is nothing more than a vehicle for advertisements. Since the launch of Windows 10, there have been numerous complaints about ads in various forms. They appear in the Start menu, in the taskbar, in the Action Center, in Explorer, in the Ink Workspace, on the Lock Screen, in the Share tool, in the Windows Store and even in File Explorer.
Microsoft has lost its grip on what is acceptable, and even goes as far as pretending that these ads serve users more than the company -- "these are suggestions", "this is a promoted app", "we thought you'd like to know that Edge uses less battery than Chrome", "playable ads let you try out apps without installing". But if we're honest, the company is doing nothing more than abusing its position, using Windows 10 to promote its own tools and services, or those with which it has marketing arrangements. Does Microsoft think we're stupid?
When Windows 10 first hit computers without a price tag, questions were asked about what the hidden cost might be. We've talked about the various telemetry, privacy-invading and tracking features that are to be found, and this is certainly part of the price one pays for a free operating system ... sorry, ad platform.
But as more and more ads have gradually crept into Windows 10, the implications of using Windows 10 become ever clearer. Microsoft has boasted about the millions and millions of computers that now have Windows 10 installed. These are not just additions to the user-base, they are consumers ready to be advertised at. It is a captive audience staring at screens all around the world -- perfect for pummelling with ads as there's nowhere to hide!
onedrive-action-center-adMicrosoft is not only incredibly aggressive with its advertising, it is also disgustingly sneaky. Many of the various forms of advertising that can be found in Windows 10 can be disabled, but don't expect this to be easy, particularly if you're not completely au fait with the world of technology. The settings and toggles that need to be changed are far from obviously placed, and the misleading wording used (yes, we're looking at you OneDrive ads in File Explorer...) means many people would simply have no idea what the settings refer to even if they stumbled across them by accident. Seriously... who would think that in order to hide the OneDrive ads, you'd need to flick a toggle labeled Show sync provider notifications?
Over the months since the Windows 10's launch, poor users have been gradually pushed harder and harder. It's as though Microsoft is trying to see just how much it can get away with before people reach breaking point. The company is utterly shameless, and it's high time more people spoke out about it.
Microsoft has found itself in court on more than one occasion for anticompetitive behavior with Internet Explorer, and if its actions with ads are anything to go by it would appear that the company has learned nothing about stopping abusing its position. As each new layer of advertising has been revealed in Windows 10, Microsoft has managed to annoy and alienate more users. Each time there have been plenty of people to jump to the company's defense and stick up for what it is doing. But the sheer prevalence of ads in myriad forms is making Microsoft's actions indefensible.
It might feel as though we're going over old ground here, and we are. Microsoft just keeps letting us (and you) down, time and time and time again.
It's time for things to change, but will Microsoft listen?

Sunday, 12 March 2017

Windows 10 Forced Update Starts Causing Problems

Slowly but surely Windows 10 has been getting better and the sizeable Creators Update due this month will improve matters further. But the biggest (and, for some, deal breaking) problem at the heart of the operating system has surfaced again…
This week Microsoft MSFT +0.31% pushed out a mysterious driver for Windows 10, Windows 8.1 and Windows 7 and it immediately began causing problems.
Listed only as “Microsoft - WPD - 2/22/2016 12:00:00 AM - 5.2.5326.4762” users were left confused as to what it did or what to look for to correct the problem. BetaNews quotes a Microsoft forum post user saying it "is the driver for Windows 10 Mobile devices" and Windows blogger Günther Born claims it is an Android driver.
And this is where Windows 10’s worst feature struck.
Windows 10 is getting better but there is still a problem at its core with now it handles updates. Image credit: Microsoft
Microsoft
Windows 10 is getting better but there is still a problem at its core with now it handles updates. Image credit: Microsoft
For Windows 7 and Windows 8.1 users the faulty driver was not a problem as it is an optional update that had to be manually installed. But Windows 10 owners didn’t get that luxury as the operating system installs all driver updates automatically and without warning.
Furthermore Windows 7 and Windows 8.1 users who did accidentally install it can simply rollback their systems to a previous restore point, but Windows 10 does not create restore points automatically and the feature has to be manually enabled. This means affected users are in a lot more trouble.
The good news is Microsoft has been quick to acknowledge the problem. The company took to Answers Forum to admit:
“An incorrect device driver was released for Windows 10, on March 8, 2017, that affected a small group of users with connected phones or portable devices. After installation, these devices are not detected properly by Windows 10, but are affected in no other way. We removed the driver from Windows Update the same day, but if the driver had already installed, you may still be having this issue.”
Windows 10 will give you more control over your updates in the Creators Update but that doesn't help users with bad updates. Image credit: Microsoft
Image credit: Microsoft
Windows 10 will give you more control over your updates in the Creators Update but that doesn't help users with bad updates. Image credit: Microsoft
And this is the problem in a nutshell. Windows 10’s permissive approach to updates has the benefit of keeping Windows 10 computers up to date, but it also relies on Microsoft getting every update and driver release 100% bug free for thousands of PC hardware combinations. Mistakes do happen and Windows 10 Home users in particular have no easy way to protect themselves.
The good news is the Windows 10 Creators Update will bring a little more control to Home users with the opportunity to delay updates. But until Microsoft trusts users enough to give them full control over what their computers can and cannot install (more than the Metered Connections hack), those wedded to Windows 7 and Windows 8.1 are unlikely to be ungrading any time soon…
___

Wednesday, 8 February 2017

Our favorite way, and the fastest method, for getting up and running with Kali Linux is to run it “live” from a USB drive. This method has several advantages:
  • It’s non-destructive — it makes no changes to the host system’s hard drive or installed OS, and to go back to normal operations, you simply remove the “Kali Live” USB drive and restart the system.
  • It’s portable — you can carry Kali Linux in your pocket and have it running in minutes on an available system
  • It’s customizable — you can roll your own custom Kali Linux ISO image and put it onto a USB drive using the same procedures
  • It’s potentially persistent — with a bit of extra effort, you can configure your Kali Linux “live” USB drive to have persistent storage, so the data you collect is saved across reboots
In order to do this, we first need to create a bootable USB drive which has been set up from an ISO image of Kali Linux.

What You’ll Need

  1. verified copy of the appropriate ISO image of the latest Kali build image for the system you’ll be running it on: see the details on downloading official Kali Linux images.
  2. If you’re running under Windows, you’ll also need to download the Win32 Disk Imager utility. On Linux and OS X, you can use the dd command, which is pre-installed on those platforms.
  3. A USB thumb drive, 4GB or larger. (Systems with a direct SD card slot can use an SD card with similar capacity. The procedure is identical.)

Kali Linux Live USB Install Procedure

The specifics of this procedure will vary depending on whether you’re doing it on a Windows,Linux, or OS X system.

Creating a Bootable Kali USB Drive on Windows

  1. Plug your USB drive into an available USB port on your Windows PC, note which drive designator (e.g. “F:\”) it uses once it mounts, and launch the Win32 Disk Imager software you downloaded.
  2. Choose the Kali Linux ISO file to be imaged and verify that the USB drive to be overwritten is the correct one. Click the “Write” button.
    kali-usb-install-windows
  3. Once the imaging is complete, safely eject the USB drive from the Windows machine. You can now use the USB device to boot into Kali Linux.

Creating a Bootable Kali USB Drive on Linux

Creating a bootable Kali Linux USB key in a Linux environment is easy. Once you’ve downloaded and verified your Kali ISO file, you can use the dd command to copy it over to your USB stick using the following procedure. Note that you’ll need to be running as root, or to execute the dd command with sudo. The following example assumes a Linux Mint 17.1 desktop — depending on the distro you’re using, a few specifics may vary slightly, but the general idea should be very similar.
WARNING: Although the process of imaging Kali Linux onto a USB drive is very easy, you can just as easily overwrite a disk drive you didn’t intend to with dd if you do not understand what you are doing, or if you specify an incorrect output path. Double-check what you’re doing before you do it, it’ll be too late afterwards.
Consider yourself warned.
  1. First, you’ll need to identify the device path to use to write the image to your USB drive.Without the USB drive inserted into a port, execute the command
    sudo fdisk -l
    at a command prompt in a terminal window (if you don’t use elevated privileges with fdisk, you won’t get any output). You’ll get output that will look something (not exactly) like this, showing a single drive — “/dev/sda” — containing three partitions (/dev/sda1, /dev/sda2, and /dev/sda5):
    Parallels DesktopScreenSnapz007
  2. Now, plug your USB drive into an available USB port on your system, and run the same command, “sudo fdisk -l” a second time. Now, the output will look something (again,not exactly) like this, showing an additional device which wasn’t there previously, in this example “/dev/sdb”, a 16GB USB drive: